

Step by step of how to customize clickup for video production
Without structure and organization most projects wouldn’t get done. Clickup is the weapon of choice for our video agency production process.
Here’s a breakdown of how. Why? And where we get it done.
It's not the most glamorous part of video production but arguably the most important.
Of course without the creativity of artists, creative directors, writers etc. ideas would be just words on paper or hidden in someone's head forever.
Clear strategy and process takes brilliant creative ideas and asks questions like ‘whats next?’ and ‘how do we get there on time?’.
In an ideal world every project would follow a simple and predictable process of steps 1-2-3-4. And the trains would always run on time.
But they don’t.
In reality creative work is messy. Projects differ. And processes need to adapt to the project, not the other way around.
NOTE: this is about our production management process. If you want a more general idea of how we make videos check out our explainer video production page.
The context and formation of our video project management system
Years ago our goal was: speed.
Today it’s reduced friction. Who knows what it will be in the future.
Changes & exploration over years have led us to the current system. A system we believe works best for us and our team.
Which is still being refined as issues arise. And recently while researching organizational tools and methods - I noticed a lot of content lacks any actual in depth explanation of “how to”.
This post outlines our best practices, experiences and all the little tips and tricks we’ve learned along the way. Lets get it!
Using Clickup for Asynchronous communication
Our team is spread across over 4-5 time zones. So asynchronous communication is ESSENTIAL to our inner workings.
Our system is based on:
- Allowing individuals to understand WHAT'S NEXT with as little “figuring out” as possible.
- Saving back and forth for critical questions or issues.
- Planned weekly meetings for check-ins
- Daily updates with details on deliverables
Our communication app stack
Today everyone is using a different app - it’s key to get your team on the same page. We’re not hardcore about any one method as long as adoption is unanimous.
Whatever creates the least friction for your organization is best. For us a combination of Clickup, Slack, and Zoom seems to do the trick.
Remember though that communication is NOT task management. Someone will need to take all the messy instant messengers and emails to ARCHIVE the important information.
This is where a platform like Clickup is unavoidable if you are doing projects at scale.
- All key data is organized here (docs, files, SOW, etc)
- Comments, questions and feedback centralized
- Easy to see deadline shifts & plan out new ones
These are a few of the reasons we use a task management platform over trying to do things like this via email and excel.
Clickup Process
Every one of our client projects starts with an entry in our click up master list.
The repository for all projects the master list details the key metrics of each project and includes the important overall documentation.
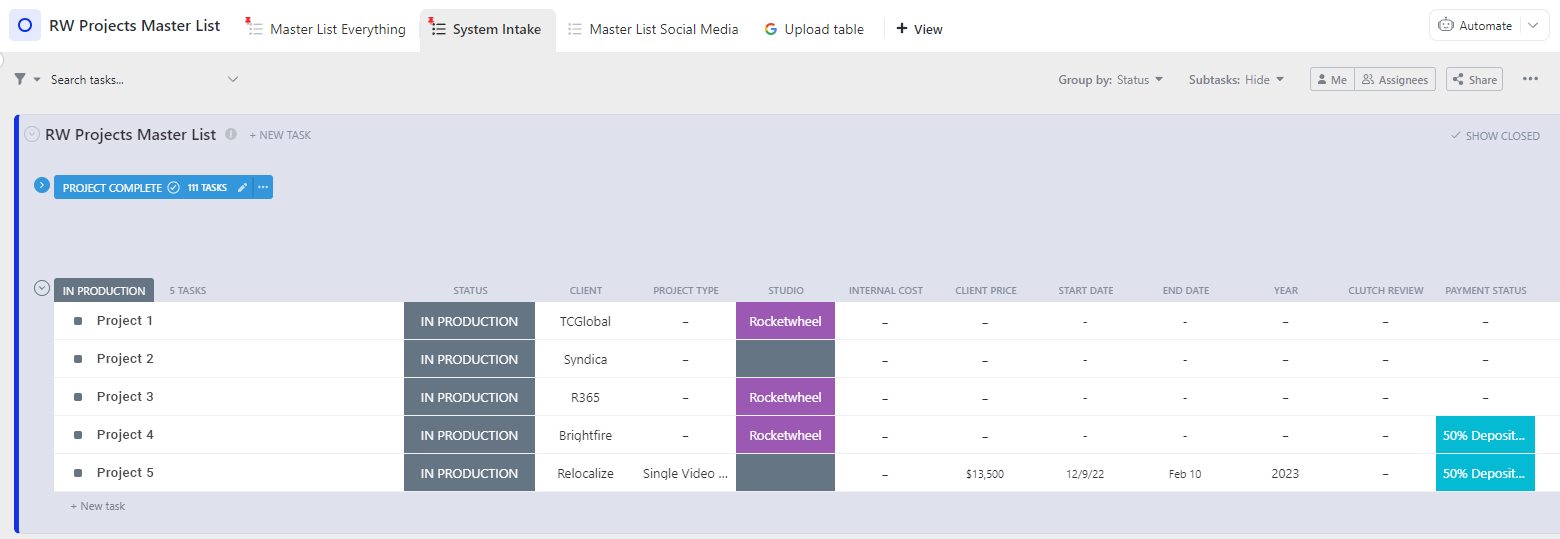
- We start by adding a new task with the status of not started
- Next we fill in the fields like the client, project type and who will work on it, budget etc.
- For projects with multiple videos each video is added as a subtask
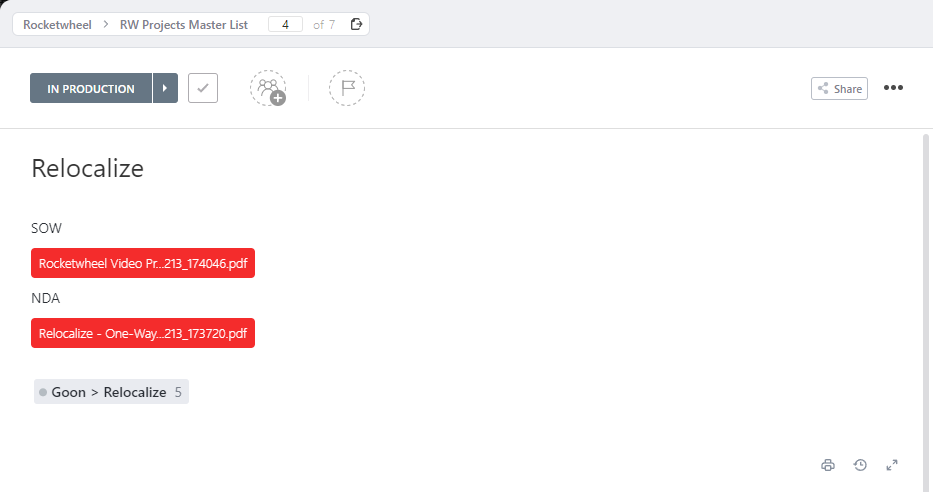
To make it easier to find any documents related to the project - we upload things like SOWs or any other project information into one folder.
This can save the hassle of having to look through your inbox if the client comes back with a change or out of scope edit.
Once the project details are defined then we change the status to in production and that intern creates the right type of project list or folder in the right click up space.
Structuring a video production workflow in clickup
The structure of every project originates from a few pre-built templates within Clickup. As I mentioned earlier, depending on the details of the project some things might necessarily change but we use this as a starting point and customize them per project.
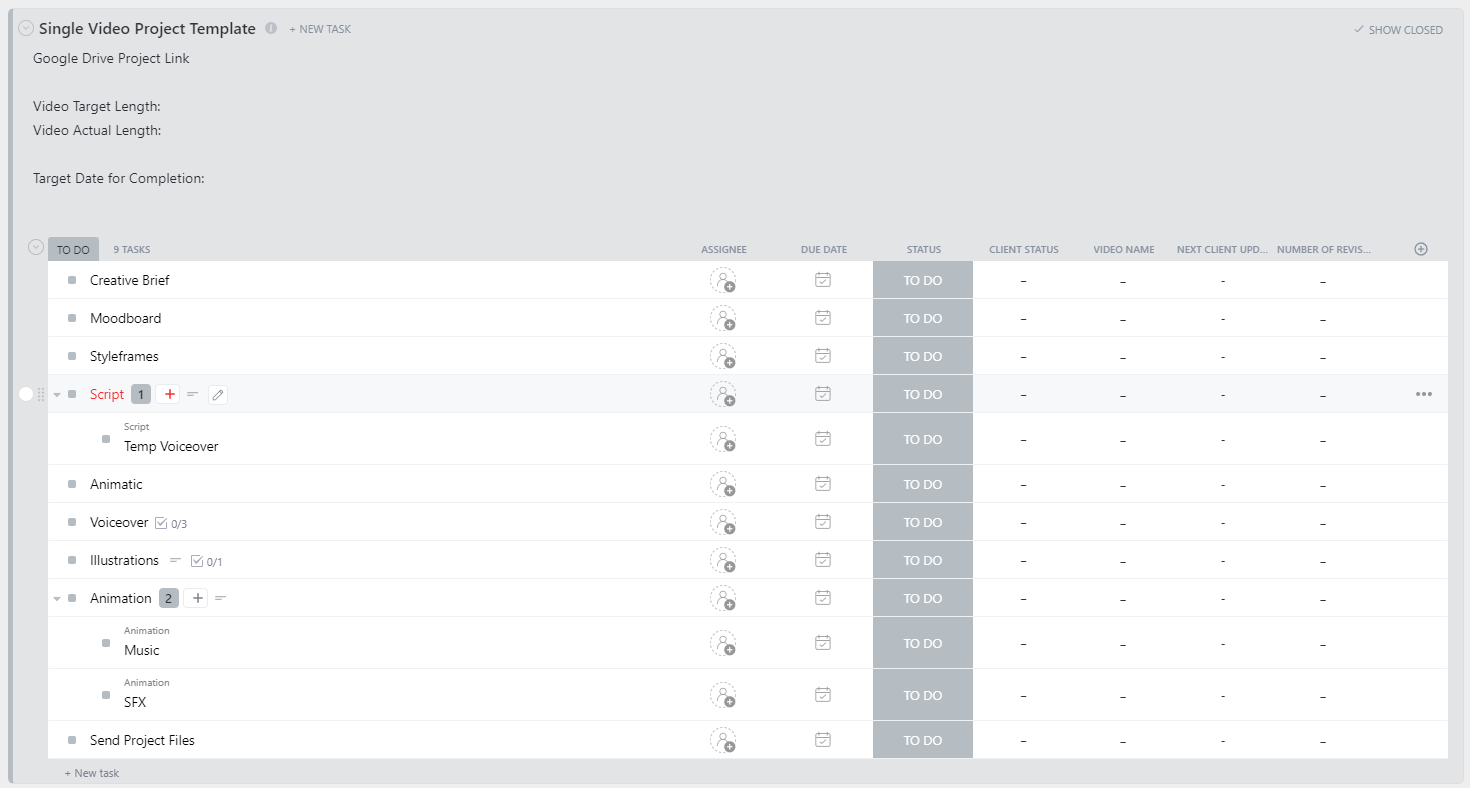
Every video has its own list if there are multiple videos as part of the same project, general project tasks like the creative brief, moodboard and styleframes get moved to their own list as they apply across all the videos.
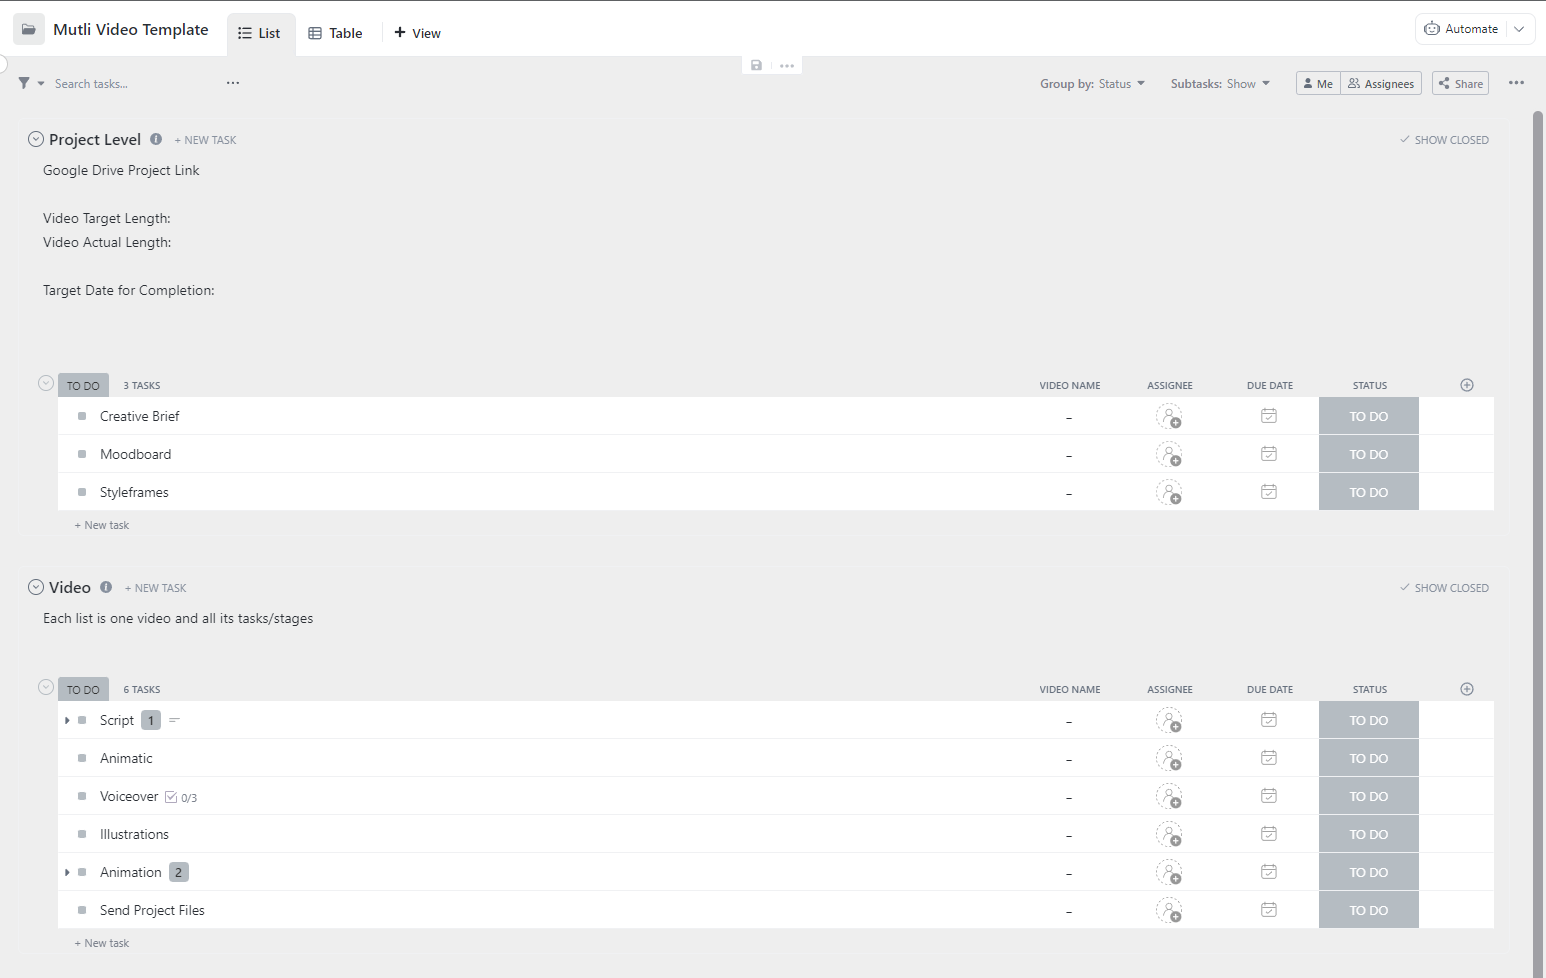
And in that list we also like to include the general information like video length, overall deadline and a link to the google drive for that project which gets us into file management.
Video Production, Clickup & Cloud Storage
It's important to maintain a clear and organized file storage structure so anyone who is working on or needs to jump on a project part way through knows exactly where to look for the files that they need and there is no delay in asking and waiting for other people to share the files.
It’s this kind of preparation which can prevent stuff like: people working on the wrong version of a project, or waiting to receive files.
We use google drive to store all files. Each client has their own drive on the google drive and within each of those we have a folder for the project. So it will look as follows:
- Project
- @Output - For all renders - the final render(s)
- Ae - For any and all after effects and illustrator files
- Audio - for all music, sfx and voiceover both actual and temp VO
- Graphics - for all logos iconography graphics etc., and animated graphics we will reuse
- Materials - for all scripts, moodboard, references, client-shared documents

I feel naming convention is very important when creating files, with names like v1, v2 final, v4 final, etc. it is often very difficult to understand which is the correct file or project.
So to avoid such confusion our ideal files name follow this format ➝ date(YYYYMMDD)_projectname_any explanatory variable - which could be something like if we just need to render a specific section like the video outro we could just put 'outro'.
Or if there are multiple full renders on one day then and only then should we use a number '_2', '_3' but any rendered on the following day would be dated appropriately.
You can use whatever naming system works best for you - but try to avoid stuff like “final render” - “real final render v3.5”... this kind of organization will catch up with you and waste a LOT of time searching through files.
A quick aside: we also create many of our own internal videos whether it be for marketing or informational purposes those rather than living in the master list are separate in their own list. However they do follow the same process which we’ll get into here next.
Now getting into the creative process every video starts with the:
Internal Creative Brief
Following a kick off call with the client we create a creative brief in a google doc for the creative team which outlines the details of the project including:
- brief description of the product + key scenes and ideas from the client
- the broad project details like the length and/or # of videos if multiple, what the videos are about ie. their purpose, the format, etc.
- if the client has shared one a demo of the product
- style information including things like references which the client will share as part of the discovery questions but also it should include a link to the graphics folder for the project which will contain all the branding information references etc. from the client (more details on this under project structure)
- lastly if the client has one already prepare a link to the script, or link to one that is the WIP
Internal Kick-Off
Once the creative team has thoroughly reviewed the creative brief we have an internal kick off call which allows all the people involved to ensure alignment on the scope of the project and answer any questions there may be.
On this kickoff we try to get all the important roles
- Script writer who will be working on the concept/script
- Creative director to help brainstorm visual ideas
- Art director to guide the stylistic vision
- Project manager to create the timeline and move everything forward
Moodboard
First step in the creative development is the moodboard which outlines the treatment for the video, the different types of elements needed etc. through a collection of references expanding upon the references already provided in the creative brief.
We also consider any specific factors and type of video for example a screencast video needed live action footage mixed with graphics.
We create the mood moodboard as a google slide with both images and some supporting description.
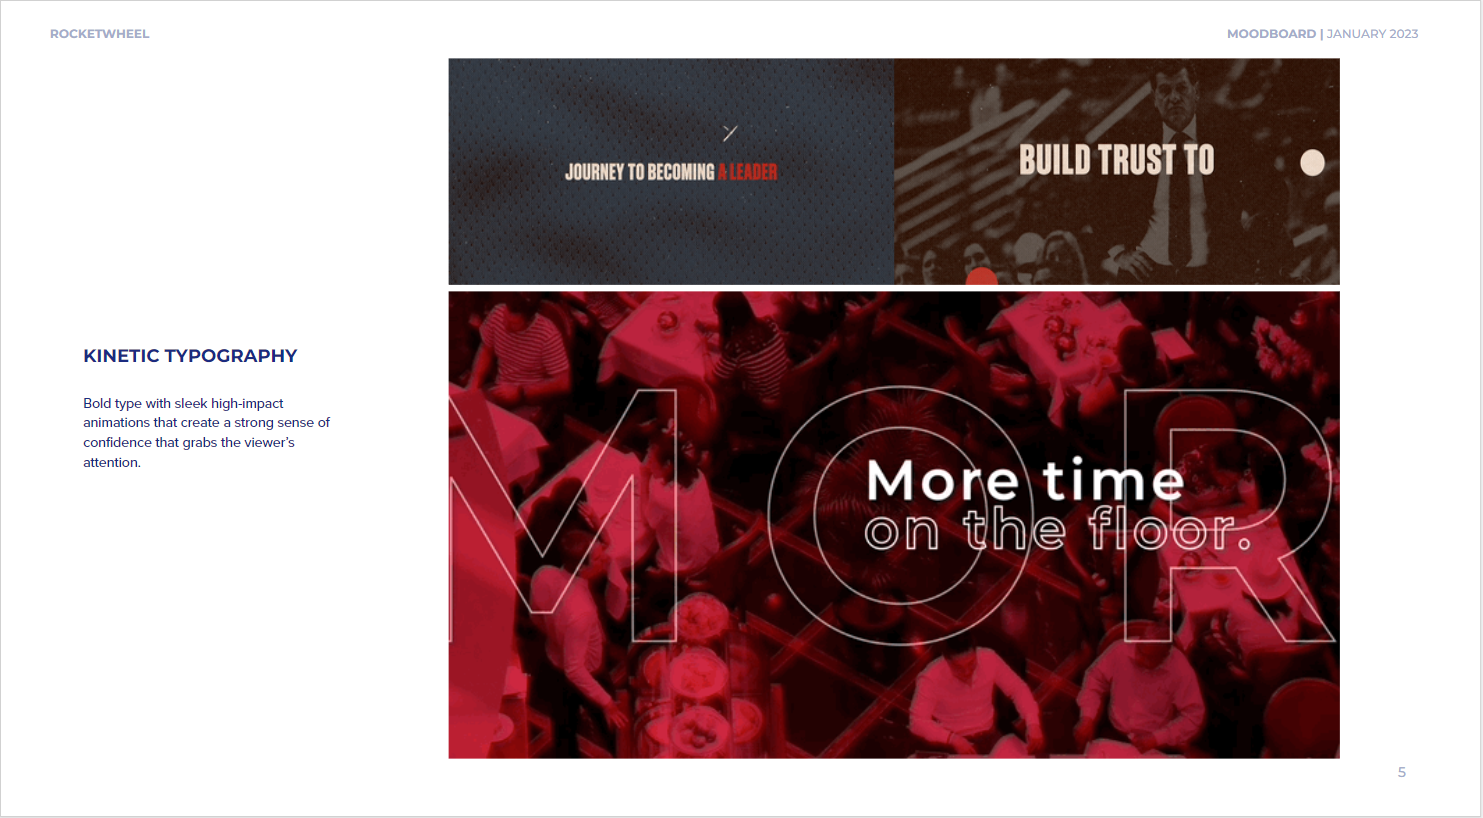
When we share the moodboard with the client a copy gets made and the suffix changes to 'client'.
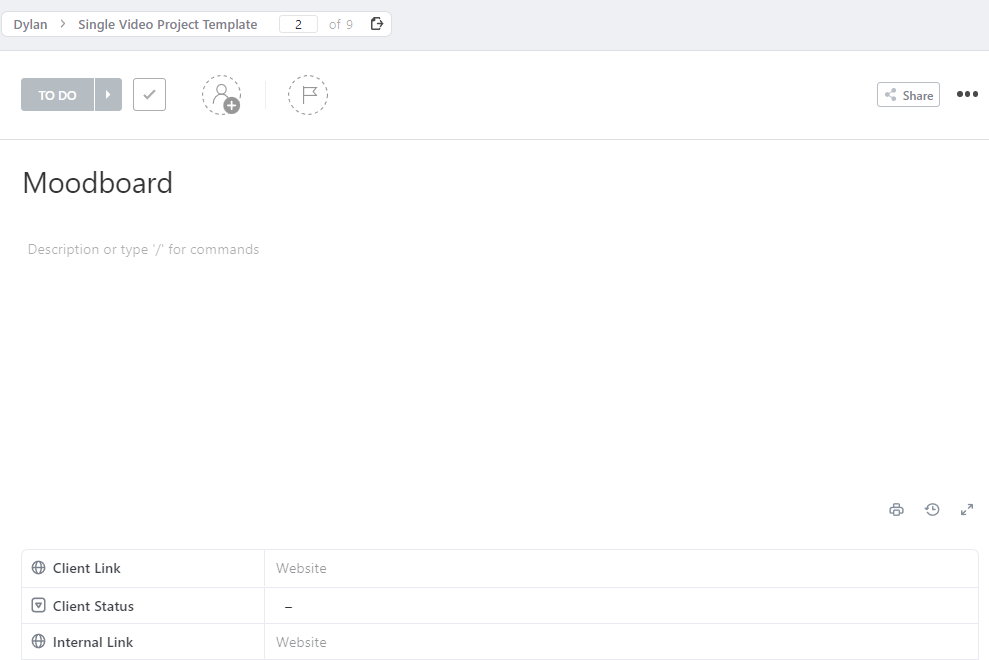
Within Clickup the link to both the internal and client versions are placed in their respective fields within the moodboard task, this allows for quick access to the latest moodboard without having to search through any comments.
But any updates to the moodboard are also linked in a comment in the comments section and any discussion around the moodboard happens within the task.
Script
The client may already have a script that is final from the start of the project. If that's the case fantastic we can proceed right into the next step of the animatic. We ask our script writer to do a rough voiceover so that the timing can be confirmed.
The client may also have a WIP script in either case it gets converted to a google doc and placed in a ‘Project Scripts’ folder within the aforementioned google drive with the suffix of 'client'.
We place it in a separate spot as the regular project folder to provide some separation of client and creatives so we make sure creatives only get the curated information they need and aren't confused by any client comments that may be clarified on a zoom meeting.
We create a copy of the script with the suffix of 'internal' for the creative and that link is the one that is added to the creative brief with the notation of WIP or Final so the creatives can know if it is final or is likely to change.
Links to both the client and internal docs just like the moodboard are placed in their respective fields in the correct script task for the video(s).
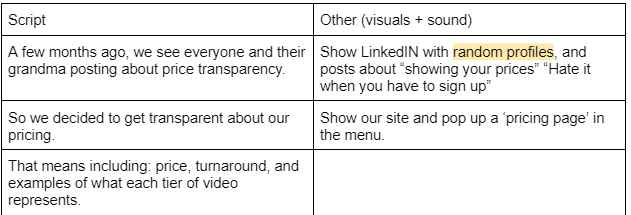
In addition to the copy, in the scripts we create we also like to include some visual direction or ideas to give both the client and creatives some ideas around the visual narrative and if there are any specific UI screenshots that are needed.
Here is an example
That google doc will allow for the client to make changes, leave comments on directly etc.
With any changes to the client google doc that are significant for the creative team, the new script is copied to the internal script either replacing the old script or clearly denoting the year, day, and time of each script version so there is no confusion.
Then a comment gets left in the correct script task (there may be multiple videos for that project) noting that the script has been changed and the internal script updated. A good rule is if the changes are small like one word or sentence is to highlight the change in the google doc so the creatives can easily see what has changed.
Once the script is 90-95% final, and only then do we move to the next step.
For more on the script you can read up on our full scripting process here.
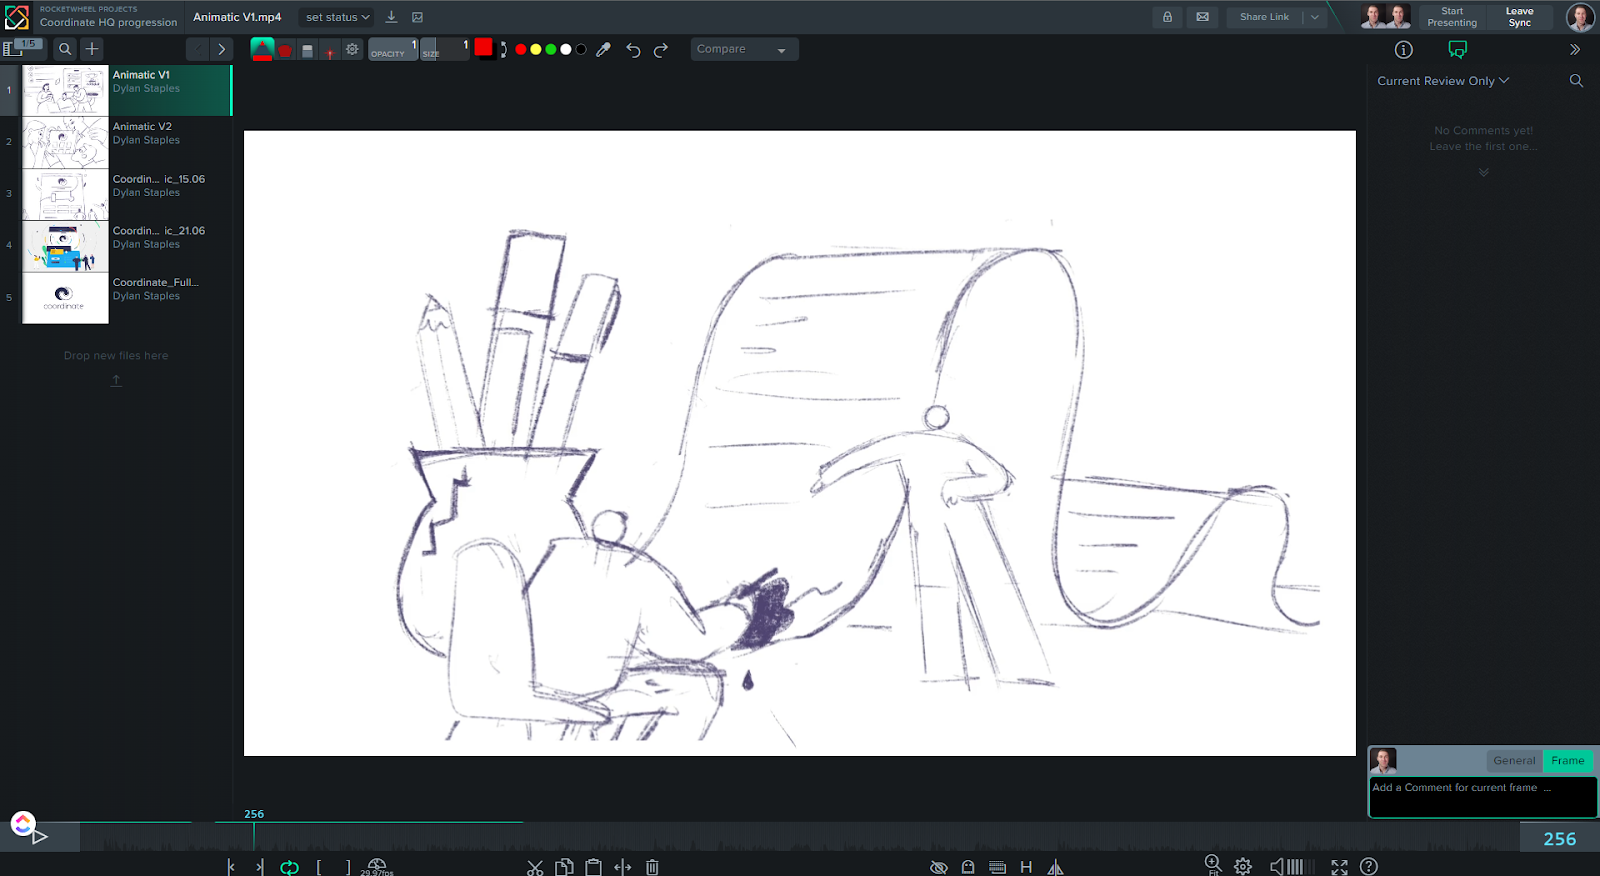
Animatic
As just previously noted a close to the final script will be needed before the animatic if we create an animatic with a more WIP script we run the risk of unnecessary versions and revisions.
The animatic put simply is a roughly sketched storyboard in video format together with a temporary voiceover read of the script along with some music. This helps the client to see and understand the visual ideas and concepts and get a sense of the flow of the video.
Temp Voiceover
The temp voiceover lives as its own task but is connected to the animatic and script in addition to pace it also helps to define the tone and feel of the video so even though a temporary good effort should be placed here to communicate the feeling that the scriptwriter is trying to portray.
Music
While not necessarily the final music a track should be chosen that matches the tone and feel of the video. A good track will also help to drive the narrative matching upswings in the music for example to climaxes in the script.
At this stage, we allow for unlimited revisions to the animatic but we monitor this carefully, once the general narrative is settled we should be working towards refining the visual narrative and not going in circles creating unnecessary versions.
From this animatic stage moving forward the way we review videos and updates is consistent through to the end of the project. All versions of the video are uploaded to syncsketch.
Syncsketch
Syncsketch serves as our single source of truth for all feedback from the animatic stage to the end of the project.
For each video in the project, 2 review links are created, one for us internally to review and update and one separate for the client. Creatives upload the new version of the video to the internal link and share that link in their clickup comment. Once the project manager/lead has had a chance to review the video for any errors or missed feedback, the video gets downloaded and uploaded to the client link to share with the client.

The reason being is just like the script we want to create a buffer between client and creatives as client feedback can require some further discussion on a call and if there are multiple people reviewing the video some comments may be redundant so we like to condense things for the creative team so they are clear and concise.
Styleframes
Here we select 2-3 frames from the animatic (if multiple videos just chose 2-3 frames from one video) and these frames get fully illustrated following the direction of the moodboard and any feedback on that.
The style frames get uploaded to syncsketch for review following the process just outlined. (above)
Voiceover
This is the only exception to the syncsketch rule as we handle most of our voiceovers through voices.com which allows us to create shortlists to share with clients and vote on.
If we find voiceover artists in another way through email for example their audition takes get downloaded and uploaded to a brand new syncsketch link in the project.
For the voiceover itself once we have a v1 of the script a job gets posted, the script doesn't need to be close to final. We allow 2 full days to get a good amount of auditions and from there a shortlist can be created and gets shared alongside the animatic v1.
Voiceover Script
Having the script in a table with the visual direction is not needed for the voiceover artist and makes things a bit more difficult to read so we create a new google doc in the Materials project folder with just the script and include the word count at the end.
The link to this script gets added to the internal link field of the task.

In the voiceover job posting it includes as much information as you can.
- a brief description of the product 1 sentence to give the artist some context into what industry this is.
- any important details of the project is this one video part of a series: are we looking for one or multiple artists etc.
- most importantly it should include some direction as to the tone that we are looking for to help with this the temp voiceover should be provided as a reference
- also the voiceover script obviously or at least a portion of the script for the artist to audition from
When it comes to approval on the voiceover artist(s), the sooner the better as it will help with fitting the visuals to the timing of the VO sometimes the VO artist read is at a different pace than the temp read and we don't want to go far over the allotted time for the video.
If the client doesn't like any of the voiceover artists selected we post a new job but the key is to understand what the client doesn't like about the shortlist we shared with them because with VO artist it may be something that we can coach them on and if need be set up a recording session with them.
Once the VO artist is chosen the artist can be hired and once we receive the voiceover it gets downloaded and uploaded to the Audio project folder in the google drive. The name of the Audio file(s) gets changed to match the file format. And that Google drive folder link is placed in the description of the voiceover task for that video.
Illustrations
Only once the styleframes are approved can we move to full illustrations for the video(s). For the illustrations, we illustrated each of the keyframes of the animatic if there are in-between frames that utilize the same assets are very similar they don't need to be repeated for the sake of saving time, but that can only be the case if the animatic is placed in the top left corner for reference as to the movement of the scene. This should also be noted to the client so they understand that nothing is 'missing' from the illustrated animatic.
Just like the regular animatic, the illustrated animatic consists of the still frame illustrations + the full proper read from the voiceover artist as well as music.
The illustrations should live in the Ae project folder inside a folder titled illustrations again following the same naming structure for files.
Music
Here we will need to make a final decision. Ideally we will have it selected previously in the animatic but this is the last chance for any potential change.
At this stage, we narrow down to only allowing for two rounds of revisions so up to an illustrated animatic v3 max as illustrations are more time consuming than an animatic. At this stage we are focused on the design of things so if there is anything that doesn’t line up with the styleframes, The visual concepts dont change unless they are misaligned to the animatic.
Animation
Animation is the next step where everything comes to life, where we add movement and transitions to the illustrations following the direction laid out in the animatic. It's important we don't diverge drastically from the initial animatic unless feedback states otherwise to change something. We want to ensure a consistent video throughout the process
Just like the illustrations the animation is limited to 2 rounds of revisions and there is no opportunity here to change the music or voiceover without incurring added time and cost.
Final Sound Design
The final step once the animation is 90% approved we add sound effects and do a final master of the audio (music+voiceover) to bring that final level of fit and finish to the video. Sound effects really help add another layer of dimension beyond the animation.
Final Project wrap up
Once the final video(s) have been approved by the client immediately we share with them the final video(s) via the google drive.
The final videos get placed in a new folder with the project title in a different google drive for the client to download from. The project files then get collected from the creatives and uploaded to both the AE projects folder as well as the folder above for the client to have.
Conclusion
That’s how we use Clickup to organize our video production process. And overall we like it - it’s part of our tech stack and serves a purpose.
Have we considered using other tools? Yes, but we also love the amount of automations that we can make within Clickup.
Not to mention how customizable it is.
It took us a while to figure out all the features that we want and need but in the end - it serves as a great repository for everything project related. And it makes finding files/comments a lot easier for everyone on our team.
There was a period of adaptation and internal learning which took us about 1.5 years to complete. But now everyone is working smoother, and finds the process more manageable. It also allows us to do projects faster, and more projects at the same time.
All which end up being a better quality customer experience and therefore a service differentiator. Our recommendation is that all creative teams should use a project management tool like Clickup.
It can be whatever works best for you - but there is no excuse for having nothing. Unless of course you are a master of mental organization.
Let us know what kind of tools are in your tech stack, and what else you’d like to know more about.


