

Disney movies have been a part of our culture now for almost 100 years.
Fantasia, The Lion King, Toy Story, Frozen - Everyone and their grandma has an iconic Disney production that's touched their life.
Take a minute to think about your favorite Disney movie. What makes it so special?
Is it the mythical storylines? The catchy soundtrack? The unique style of humor? The characters and their personalities?
Or maybe, just maybe, it's the animations that made the videos so special for you.
Using frame by frame animation techniques, Disney creates magical worlds and characters that are simply impossible to recreate any other way.
Animation can explain whatever the mind of man can conceive - Walt Disney
But we'll be honest with you:
Animating every single frame of a video is expensive and time consuming.
It's not something we use on every project, and when we do, it's usually only on a few key scenes. The uniqueness and personality can bring a video to life, but for most projects adding this magical touch is simply not worth the extra time and budget.
In this article, we'll show you what goes into frame by frame and why it's so resource-intensive to help you decide if it's right for your next video production. Specifically, we'll cover:
- What frame by frame animation is and how it's done today
- How we mix frame by frame with other animation techniques to get the most from our video budgets
- The benefits and drawbacks (so you can decide whether it's a good fit for your next video)
- And just for fun, we'll go over some tools you can use if you're interested in trying to make your own frame by frame animation
What is frame by frame animation?
Frame by frame animation is a traditional animation technique where every single frame is drawn individually by an artist. Every frame is drawn slightly differently from the previous one, and when played together create the impression of movement.
Since it's such a pain-staking process, and since animations can be created using software now (as we'll cover next), videos fully animated frame by frame are much less common these days.
In fact, Disney hasn't had a 100% frame by frame, hand drawn animation since 2009.
Today, there are still some independent studios and creators that exclusively animate frame by frame. This is usually done for the artistic effect it creates, and not the production quality of the animation. Three common methods they'll use are:
- Rotoscope animation: This is essentially drawing over live action footage to get very realistic animations.
- Stop motion animation: Anywhere from a few hundred to over 100,000 individual photos are taken of physical objects, with the object moving slightly every time. These photos are played sequentially to create movement.
- Flipbook animation: The original animation. Each 'frame' is hand-drawn on a separate page, and then the pages are physically 'flipped' through to create the animation.
However, most studios now only add in frame by frame edits when animation software can't render the scene they're envisioning.
Mixing frame by frame animation with other animation techniques
Instead, modern animation studios use animation software to automatically create and render their concept.
There are two main tools that we use to automatically animate objects in between frames:
- Tweening
- Rigging
Tweening
Tweening is the process of automatically generating frames between two manually drawn frames (called keyframes).
With traditional animation, the main animation artists would draw the keyframes of a scene, and then the animation teams would have to draw each frame between these keyframes. This was called "inbetweening" - which has been shortened to just "tweening" today.
This was a very labor-intensive process, so sometimes only every second or third frame was re-drawn (called animating on-twos and on-threes, respectively). For scenes that had complex motion, or where long distances were covered on screen, every single frame had to be animated (on-ones).
Or, if they wanted to save resources, they would draw smear frames to create the illusion of motion without having to animate on-ones.
Today, our animators will simply draw the keyframes, and the motion animation software will automatically tween the required frames. Once this is done, the animators will review these tweened frames and make any needed edits to improve the video animation.
Rigging
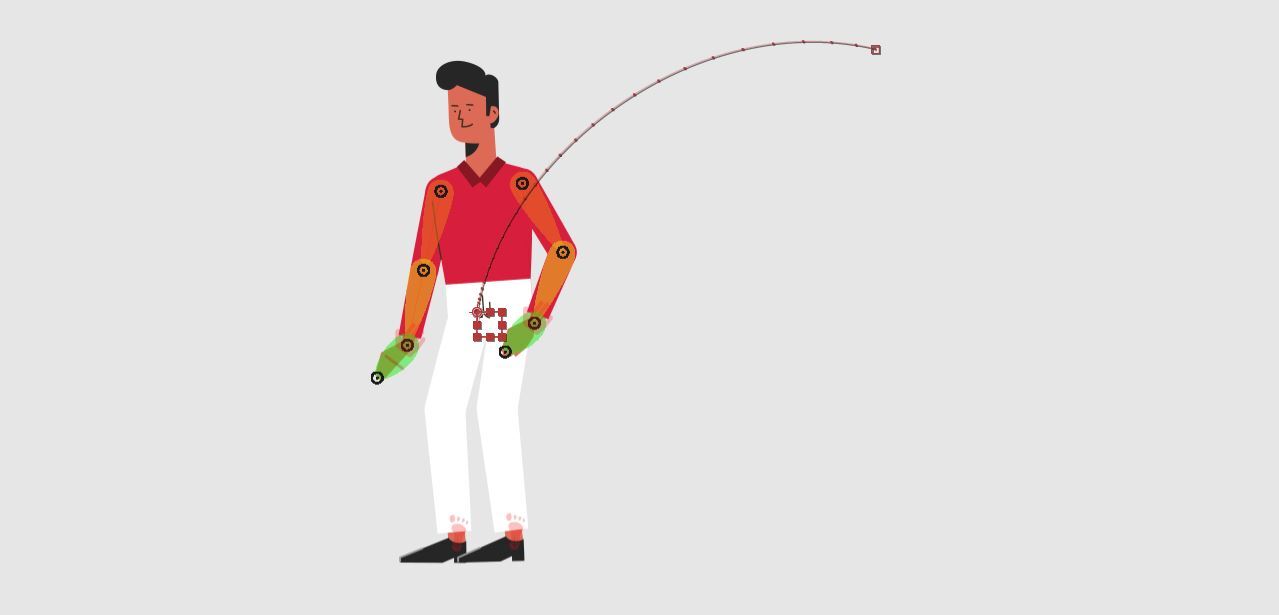
Rigging is an animation technique where a 3D or 2D animated character is overlaid on a digitally-rendered internal bone structure. This bone structure is manipulated to create character movement (this can be realistic and natural-looking movement, or idiosyncratic movement patterns for a particular character).
The first step in rigging a character is creating the character's base structure (called a puppet). The whole anatomy has to be created, with joints and limbs, and then you have to instruct the computer how each of these parts moves and bends.
Once the characters are created, they can be added to the animation, and then animated using a combination of tweening and frame by frame animation.
Onion skinning
To streamline the animation process even more, we'll use a common animation software feature called onion skinning.
This feature shows the animators the several frames before and after the one frame they're currently looking at. This way they can get a good idea of how a particular frame works with the character's entire motion, without having to go through each frame one by one.
Benefits of frame by frame animation
The main benefit of frame by frame animation is the creativity and control it gives you.
Using only tweening and rigging can sometimes lead to rigid and mechanical motion.
Animating frame by frame lets you be as creative and experimental as you want. You can add nuance to facial expressions and body language, create dynamic and unique movement patterns, and animate graphics very dynamically.
Disadvantages of frame by frame animation
The biggest disadvantage of frame by frame is the cost.
A lot of labor goes into drawing each frame and animation sequence, which makes it a time-consuming and expensive process. A ten-second frame can take hours for an animator to create.
If your project has a quick turnaround or a tight budget, this might not be a great option for you.
If you still want to animate frame by frame, you can animate on-twos or on-threes, but then the quality starts to noticeably deteriorate.
How to get started with frame by frame animations
1. Plan your project
Every successful project needs a plan.
First, you need to pinpoint the main idea, the target audience and the purpose of the project.
What message and story are you trying to convey? Is it to raise brand awareness or do you want to generate conversions? You should also note down other important points, like your budget and timeline.
You need to plan your workflow. What cadence do you want to set? How often can you work on the project?
2. Create your storyboards
Before diving straight into animating, you need to know exactly what you're animating.
Your storyboards will help you visualize your project.
Sketch the basic composition of each scene. Draw a rough sketch of characters, poses, facial expressions and other features you want in your project. Determine key features such as your frame rate and walk cycles.
Once you have your storyboard, you can go ahead and start your sketching.
3. Begin with a sketch
Like everything in animation, it begins with a sketch.
Start with your main outline and add in your details. Make sure you strike a balance between simple and complex details.
Once you're happy with your initial sketch, you can go ahead and finalize the image.
4. Starting the animation process
You need to make a different image for each frame. This will depend on what you're trying to portray—it could be your character walking, or a scene transitioning.
To begin, you need to create layers in your timeline panel. Set the timeline frame rate to what you specified in your storyboards. With Photoshop, you have two options. You can either use standard layers or video layers. With standard layers make sure your layers are adjusted on the timeline.
Create the animation for the first frame of the sequence using the drawing tools you're comfortable with.
Click the next frame and edit the content of the frame to create motion.
Repeat these steps, making gradual changes between each frame to create a frame-by-frame animation.
Be as patient as possible with the animation process, it's very laborious. This is your opportunity to view everything together and make any changes (if you wish to). It's time to smooth every curve and connect every line and make some edits.
Include principles of animation
Now that the timeline and layers are sorted. It's time to consider which principles of animation to incorporate into your project. You might not use all, but you're likely to use these ones:
- Arc: This is all about movement. Most movement follows a natural trajectory. For example, when you're walking, your legs extend to a certain angle. If your characters are moving in your animation, make sure their arc is natural.
- Secondary action: If your character is moving its legs, it's unlikely the rest of its body will be still. You can add some secondary action like arms moving. Secondary actions add a realistic touch to animations.
- Timing: This is the number of frames for a specific action. For example, how many frames you'll use to depict a character smiling. You can use timing to reflect a character's personality and emotions.
- Straight ahead action or pose to pose: Straight ahead is where you animate the scene from start to finish. Pose to pose is where you animate the scene at the beginning of the keyframe, the end and between a few frames.
If you want fluidity in your movement, straight ahead is a great option. However, if you want more dramatic effects, pose to pose is your best bet.
Frame by frame animation software
There's a wide range of software you can use for your animations.
When looking for the right software, there's a lot of things you need to consider, the ease of use (especially if you're a beginner), the features and tools available, whether you can export files easily, and of course the price.
Photoshop + After Effects
Photoshop and After Effects are great tools to use in combination. You can use Photoshop for the drawing of each frame and the after effects, like tweening and rigging can be done on After Effects.
Although Photoshop wasn't created for the purpose of animations, it is a good starting point due to the easy to use interface.
There's a wide range of features and tools available in Photoshop and because it's so popular, there's loads of resources online (Adobe Help pages, YouTube etc) to help you if you ever get stuck. With that being said, it's pretty easy to work around, and affordable.
After Effects has great features, however you need to do your frame-by-frame animation in another software and import the file.
Photoshop is a good starting point for beginners, however, as your skills build up and you get better, you may want to opt for other software for more advanced features. Pricing starts at $20.99 a month, which covers you for both applications.
Adobe Animate CC
Adobe Animate CC is a market favorite for 2D animation. Adobe Animate stands out as a leader in frame-by-frame animation as it has virtually every tool you need for animation. You can tween, rig and export files with ease. Adobe Animate is a great tool for animators who have experience with frame by frame.
If you're not that experienced with frame-by-frame, the sheer amount of tools can get overwhelming and confusing. But once you get the hang of it, there's no digital limit on the types of visuals you can create. The good thing is that there are plenty of resources to help you tackle the steep learning curve ahead of you.
Adobe Animate is the perfect medium for animators who are looking for software where they can animate from start to finish on one platform. Pricing starts at $20.99 a month.
Cacani
Cacani is a Singaporean 2D animation software that's very popular in Asia and used by anime studios. Cacani offers a good user interface, it's pretty straightforward and self-explanatory. You don't have as wide a range of tools as other animation software, but you are able to tween— very well. Cacani offers a very advanced tweening feature, auto tweening.
However, Cacani is limited to Windows users only, so if you use MacOS— sadly you can't use Cacani. Plus, Cacani seems to be inactive in terms of regularly updating the software. Plus, if you're looking for high quality animation, Cacani isn't the tool for you. The brush and pencil features aren't as advanced as Photoshop or Adobe Animate CC.
If you're looking to create anime-style productions, Cacani is a good choice. However, for different production styles, Cacani falls short. Cacani is priced at $20 a month.
Harmony Toonboom
Harmony Toonboom is the most advanced animation software on this list and it goes without saying that it is non-beginner friendly. Rick and Morty— the animated sitcom, produced in Harmony Toonboom. The tools are advanced but will take your animation up to the next level. You have advanced rigging and onion skinning features and you can also create in HD resolutions.
If you're just beginning your animating journey, it's not worth using this software as the learning curve is very steep. Harmony Toonboom isn't an animation software that you can use to build up your skills. It's more for refining your animations. If you're a more experienced animator, Harmony Toonboom is a great choice, however, a lot of users have reported glitches.
Harmony Toonboom offers tiered pricing depending on the features you need. Essentials is $25 a month, which only offers basic paperless animation tools. Advanced pricing is $64.50 a month, which offers advanced tools for paperless animation.
Premium pricing is $117.50 a month, which offers the tools needed for a full fledged animation studio.
Flipbook
Flipbook is great for beginners and those who are still getting the hang of 2D animation. Flipbook is also a great option for animators who love traditional frame by frame animation. If you're not well versed in drawing straight on the computer, you can scan your drawings and upload them onto the software and trace over them.
Flipbook is also easy to use, with a non-complicated user interface. However, you are limited in what you can do. While you can use onion skinning, there's no ability to tween or rig. You have to solely focus on frame by frame and cannot include other animation styles— which is outdated. Flipbook doesn't use vector-based images, so you can't convert your images to vector graphics.


